
Preface
The replacement of MessageBox for Windows Store apps is the class MessageDialog.
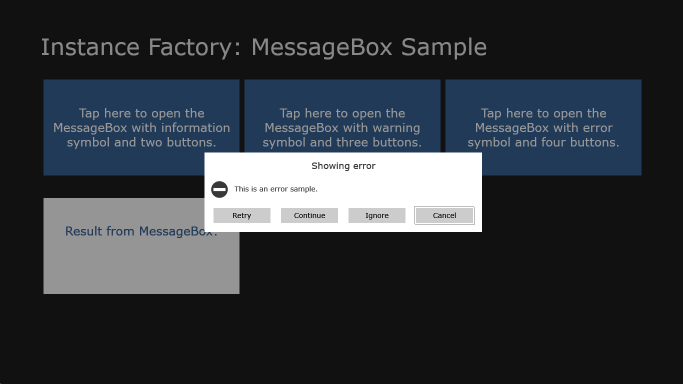
This class is fine as long as you do not need more than three options the user can choose from. In technical words, MessageDialog allows only up to three commands. At the time of writing, this is not mentioned in the documentation of the Commands property, but in Quickstart: Adding a message dialog (Windows Store apps using JavaScript and HTML). In case you try to add more commands, an exception will be thrown: “The operation attempted to access data outside the valid range (Exception from HRESULT: 0x8000000B)”
Of course, I do have the need for more than three commands. But the new control should not differ much from MessageDialog.
This results in the following requirements:
-
Show the message box by calling a
ShowAsync method
Dynamically add IUICommand-based commands with a button label, an optional Action that will be executed when the user selects the command, and an optional id
Define a default cancel and default focus command
Show a message, an optional title, and an optional symbol
Reset the focus when the message box closes
ShowAsync & Dynamic Number of Buttons
This part was the most challenging one – and the funniest one too 🙂
The approach in the sample is this:
-
Have a popup torso, ready to be filled with title, message, symbol, and command buttons
Create one button per command, and attach a
ManualResetEvent to each button
Start a new thread and let it wait for of one these wait handles to be signaled, i.e. wait for the user to push one of the buttons
Map the signaled wait handle to the corresponding action
Meanwhile, await the completion of the new thread
Execute the action by the main (UI) thread
Return the selected command
Reset the focus
Add Commands To Popup
Before it makes sense to bring up the message box, the buttons for the commands have to be added. And there needs to be some kind of connection between the buttons and the ManualResetEvents that are required for async usage. Here is the implementation.
// Implemented by MessageBox
private void AddCommandsToPopup()
{
  // In case no commmand is set,
  // add a continue command without an action.
  if (CommandList.Count == 0)
  {
    CommandList.Add(new UICommand("Continue"));
  }

  // Remove exiting buttons
  // in case ShowAsync was called more than once.
  ControlStackPanel.Children.Clear();

  // Create the delegate command used when a button is pressed
  DelegateCommand<ManualResetEvent> delegateCommand
    = new DelegateCommand(OnButtonPressed);

  // Iterate over the list of commands.
  foreach (IUICommand command in CommandList)
  {
    // Create a new wait handle for the command
    ManualResetEvent waitHandle = new ManualResetEvent(false);

    // Add it to the list.
    WaitHandleList.Add(waitHandle);

    // Create the button and attach the wait handle.
    Button button = new Button()
    {
      Command = delegateCommand,
      CommandParameter = waitHandle,
      Content = command.Label,
      Style = (Style)Application.Current.Resources["ButtonStyle"]
    };

    // Add the button to the popup
    ControlStackPanel.Children.Add(button);
  }
}
Handling Button Pressed
This command handler is really simple. The only intention is to let the waiting thread know that a button was pressed. This is done by signal the ManualResetEvent that is associated to button as the CommandParameter. That’s it.
// Implemented by MessageBox
private void OnButtonPressed
  (
  ManualResetEvent waitHandle
  )
{
  // Just signal the wait handle.
  waitHandle.Set();
}
Open the Message Box and Wait For User Input
Now that everything is prepared, we can go on and show the message box.
// Implemented by MessageBox public async TaskShowAsync() { // Add all commands to the command bar // and create the matching wait handles. AddCommandsToPopup(); // Keeps the index of the signaled wait handle. int signaledHandle = -1; // Find the control currently having the focus Control focusedControl = FocusManager.GetFocusedElement() as Control; // Start the thread to wait for user input. Task waitForUserInputTask = Task.Run(() => { // Wait for a handle to be signaled. signaledHandle = ManualResetEvent.WaitAny(WaitHandleList.ToArray()); }); // Open the message box with a popup. Popup popup = PopupHelper.CreateFullScreenWithChild(this); // Set the focus on the defined button if (FocusCommandIndex >= 0 && FocusCommandIndex < CommandList.Count) { ((Button)(ControlStackPanel.Children[FocusCommandIndex])) .Focus(FocusState.Programmatic); } // Wait for the wait thread to finish // (one of the events to be signaled) await Task.WhenAny(new Task[] { waitForUserInputTask }); // Free all wait handles. while (WaitHandleList.Count > 0) { WaitHandleList[0].Dispose(); WaitHandleList.RemoveAt(0); } try { // Invoke the event handler of the selected command // in case it is defined. if (CommandList[signaledHandle].Invoked != null) { CommandList[signaledHandle].Invoked .Invoke(CommandList[signaledHandle]); } } catch (Exception) { // re-throw any exception caused by the event handler. throw; } finally { // Make sure the popup will be closed. popup.IsOpen = false; // Release the message box from the popup popup.Child = null; // Reset the focus if (focusedControl != null) { focusedControl.Focus(FocusState.Programmatic); } } // Return the selected command return (CommandList[signaledHandle]); }
That’s all the “magic” behind the async call. The very important implementation detail is that the sequence of the list of commands and wait handle have to be the same. Because ManualResetEvent.WaitAny returns the index of the signaled wait handle, it is very simple to call the corresponding event handler.
UI Controls Must Not Have Multiple Parents
To be able to call ShowAsync more than once on the same MessageBox instance, it is important to “release” the instance from its containing Popup. This is done by setting the Popup.Child to null.
In case the MessageBox is not released, an exception will be thrown when it is set as the child of a newly created Popup. The exception’s message is “Value does not fall within the expected range.” It is thrown by Popup.put_Child, means the setter of the Child property.
Well, the message does not seem very helpful to me. But after all, it makes sense that a UI control cannot have multiple parents. This is why the local Popup‘s Child is set to null after it is closed.
Using the MessageBox
In case the implementation details are a little bit confusing to you: relax. You don’t have to implement it yourself 😉 Focus on the usage. This should look very familiar to all users of MessageDialog.
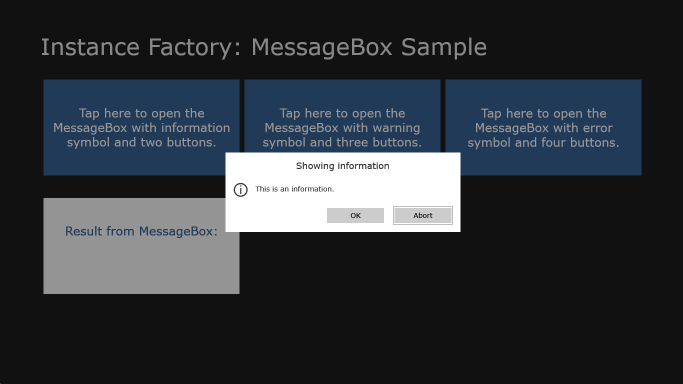
// Implemented by MainPage
private async Task ShowInformationAsync()
{
  // Create the message box.
  MessageBox messageBox
    = new MessageBox("This is an information.",
        "Showing information", MessageBoxSymbol.Information);

  // Add the commands
  messageBox.CommandList.Add(new UICommand("OK",
    action: null, commandId: "Confirmed"));
  messageBox.CommandList.Add(new UICommand("Abort",
    action: null, commandId: "Aborted"));

  // Set the index of the focus and cancel command
  messageBox.FocusCommandIndex =
  messageBox.CancelCommandIndex = 1;

  // Show the message box
  string selectedCommandId
    = (string)(await messageBox.ShowAsync()).Id;

  // Show the value selected
  ResultTextBlock.Text = selectedCommandId;
}
This sample uses the id of the selected command. The code contains samples using the event handler (action) and just the command too.
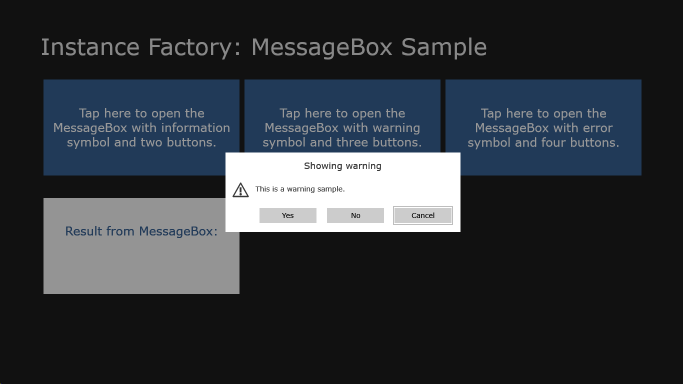
Please notice that the MessageBox implementation allows you to add a symbol. There is a definition for information, warning, and error included in the sample. In case you need some more, feel free to extent the code.
Disable AppBars
The MessageBox suppresses the opening of app bars, caused by a right click, as long as it is open. This is implemented by MessageBox by handling the RightTapped event. The Handled property of the event arguments is set to true.
It does not prevent the app bar from being opened when the user swipes in from the lower edge. There is no simple event to be handled for this gesture. One idea might be to handle the Opened event of the AppBar. When a MessageBox is open, the event handler should close the AppBar immediately.
Popup Dialog Basics
Please refer to BusyIndicator for Windows Store Apps in C# / XAML for details on popup dialog basics, like disabling the user to interact with the app.
For details on command delegates, please refer to Simple and Generic ICommand Implementation for Usage in XAML.
The Sample
Links
Quickstart: Adding a message dialog (Windows Store apps using JavaScript and HTML)
BusyIndicator for Windows Store Apps in C# / XAML
Simple and Generic ICommand Implementation for Usage in XAML
This definitely a good info!